Tips, Techniques, and Tutorials / beginner quilters

  • Supplies for Beginning Quilters: Cutting Tools

    Supplies for Beginning Quilters: Cutting Tools

    Did y'all know that we love what we do? 

    It's true! And we really love hearing from people who are new to quilting and are looking for a few tips on getting started. We love it so much that we thought it might be nice to share with the rest of the world! 

    There really are lots of wonderful perks to running Bloomerie Fabrics. Even though we operate strictly online, we do get the pleasure of 'meeting' beginning quilters and sewists who are excited to get started. And like any time we try something new, we don't always know what we'll really need. Not a list of the things experienced or specialized quilters need -- but the basics that whet our appetite, allow us to get started, allow us to successfully cut, piece, bind and quilt, and give us a collection of tools and supplies that we can build on as we get more serious about quilting.

    So we've decided to put together this post to welcome new quilters (YAY!) and give you the low down on what must-have tools and supplies you're going to need for your first quilt.

    Cutting Tools

    Let's start with the holy trinity of cutting tools: self-healing cutting mat, rotary cutter and scissors. These are absolutely essential for quilting at all levels.

    Self-Healing Cutting Mat

    When it comes to quilting and sewing, there is no other tool used more frequently than the self-healing cutting mat -- sewing machine aside. 

    These are those kind-of-hard-but-still-bendy gridded mats you may have seen in craft and fabric stores. They manage to withstand the abuse sustained from the sharp blades of rotary cutters, time after time. (Side note: They will eventually need to be replaced, depending on how frequently you cut. We happen to cut A LOT -- so we require a new one once every 2 years or so. The average quilter should be able to go a lot longer than that!)

    They come in a variety of sizes, from small (like 8" x 8") to large (like 36" x 72" and bigger). The size you choose is a matter of personal preference and space, but we recommend at least an 18" x 24" or 24" x 36" if you have the space.

    Rotary Cutter

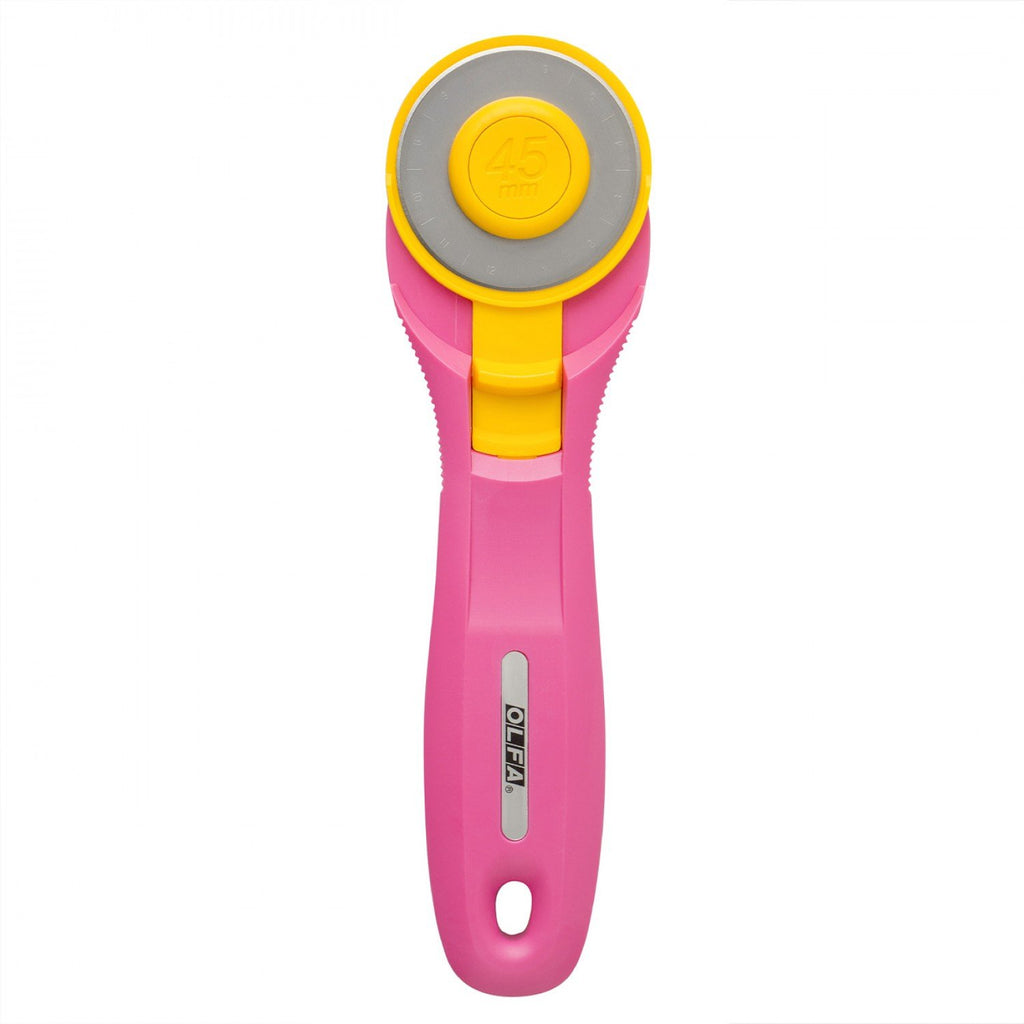
    Precise cuts are key for quilting -- and the best way to get these is with a rotary cutter. 

    When you shop for one, you'll probably be surprised by the number of options available. But we're going to share a few tips to help you cut through the variety and quickly hone in on a great first rotary cutter.

    Size - Rotary cutters typically come with either a 28mm, 45mm or 60mm blade. Stick with a 45mm for your first one.

    Safety - This is a big one -- especially if you have kids or like having your fingers. (And we suspect that pretty much covers everyone!) You'll find some rotary cutters rely on pressure to automatically hide the blade when not in use, some rely on a latch or other manual mechanism that you'll engage and disengage to hide/reveal the blade, some will come with a blade cover, and... believe it or not... some have nothing. I've used the first two mentioned here and they're both just fine. My personal preference, though, is the one with a manual safety latch since accidental pressure won't reveal the blade and cause anything unexpected. (Can you tell I have kids?)

    Feel - Once you've narrowed it down to size and safety options, try holding the remaining 'prospects' in your hand to see how they feel. And take note if it's for right, left or right- and left-handed people. Choose appropriately.

    Scissors

    I'm guessing you probably have a pair or two of these laying around the house right now. As long as they're not the kid ones, they'll do just fine for someone starting out. Just make sure they're gunk-free and are reasonably sharp. (You can always do a little home-sharpening of your scissors by folding a piece of aluminum foil a couple times and then cutting some straight lines in it. It's not a professional-grade sharpening, but it will help out.)


    Continue reading
  • A Jelly Roll Strip Quilt quilt-along - Part 1


    We love getting emails from our customers, and from time to time we hear from people who are new to quilting and just don't know where to start. Inspired by y'all, we figured there was no better time than National Quilting Month than to welcome new quilters and host our very own Jelly Roll Strip Quilt quilt-along.

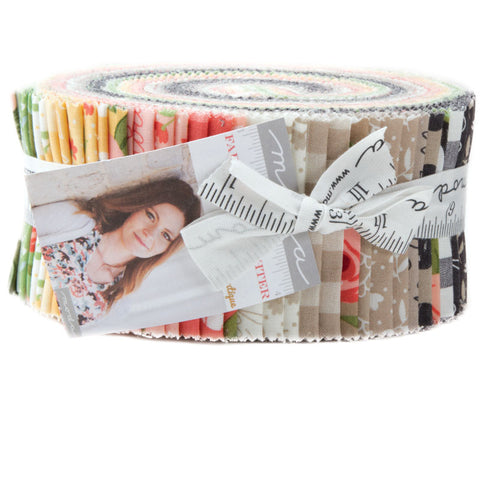
    Now, if you're new to quilting and you're not quite sure what a jelly roll is, you may be wondering if we've got our heads screwed on straight because the last time you checked, jelly rolls were something you eat. So here's what we're talking about when we say jelly roll:

    Pretty nifty, huh? But you might still be wondering what this really looks like. So just imagine 40 strips of fabric, already cut to 2.5" wide and 44" long. Now roll them all up together and you get this adorable jelly roll, spirals and all.

    We're going to go ahead and get started today with the quilt-along. Today's easy... just gather up your supplies and clear some time off your schedule. Here's what you're going to need:

    • Moda Jelly Roll (we're using Aneela Hoey's Little Apples)
    • backing fabric - 1 3/4 yards
    • quilt batting (45" x 60")
    • coordinating 100% cotton thread
    • rotary cutter
    • cutting mat
    • air erasable pen / Clover White Marking Pen / disappearing ink pen
    • quilting rulers (6" x 24" and a 12.5" square will do perfectly; other similar sizes will work fine, too)
    • Temporary Spray Adhesive/ Spray Basting
    • sewing machine, of course!

    All this for a finished quilt size that's approximately 42" x 56".

      Check back in Monday, when we'll start working on our quilt top!  Part 2


      Continue reading
    • Jelly Roll Strip Quilt quilt-along: Part 6, Making and Attaching Binding

      This is it, y'all... the final installment of the Bloomerie Jelly Roll Strip Quilt quilt-along! The only things left to do are squaring up the quilt (again) and making & attaching the binding. (And then, of course, snuggle under the newest quilt on the block!)
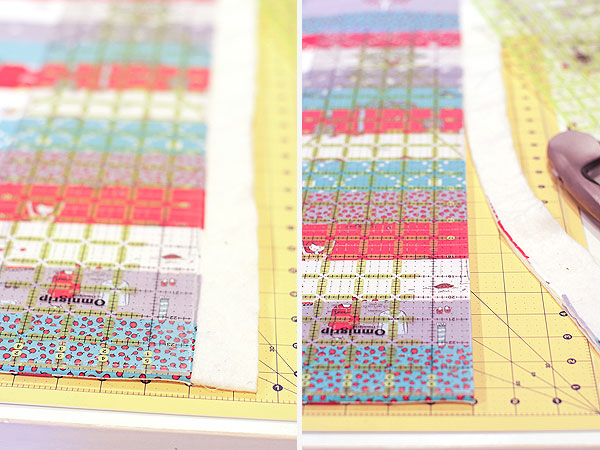
       

      So let's start by squaring up the quilt one last time. We're going to be using the same basic principles we used to square up in Part 4. To sum up, fold the quilt in half, use your rulers to determine your cut line, and trim the edges. (Always check and double-check before you cut.)

      Once we've done that, we'll need to figure out how much binding we'll need for our quilt. To do this, measure the outside perimeter of the quilt and then add 10" - 15" for good measure. Here's the math for my quilt:

      • Quilt size = 42" x 56"
      • Perimeter = 42 + 56 x 2 = 196"
      • Binding needed = 196 + 12 = 208"

      So now I know I need 208" of binding to do this quilt. And since we're using a few of our leftover jelly roll strips, we now need to determine how many strips are needed to get 208". So here goes a little more math:

      • Jelly Roll Strip Length = 42" (each strip is a little different, so I'm taking the length of my shortest jelly roll strip minus 1" for the selvages, which we'll trim off)
      • How many strips do I need = 208 ÷ 42 = 4.95... (208 is the binding needed from above, 42 is my jelly roll strip length)
      • Round up that number = 5

      So now we know we need 5 jelly roll strips for this 42 x 56" quilt. Let's start making the binding.


      Grab your 5 jelly roll strips and trim off all the selvage edges, like shown above.


      Grab 2 of your jelly roll strips and place them right sides together as shown above. All your edges should line up. With your ruler, mark a line from corner to corner. Pin or clip your strips if necessary to keep them in place. Using your sewing machine, stitch along that line.


      When you're done, you'll end up with a piece like this that is joined on the bias (front side is on left, back side is on right). See that triangle on the right side? We'll be trimming that off in the next step.

      With your ruler, line the 1/4" ruler mark with your stitch line. With your rotary cutter, trim off the excess. And you'll be left with that cute little triangle -- and a perfect 1/4" seam allowance.

      Repeat these steps for all strips until you end up with 1 long piece. 


      Take your 1 long binding strip over to the ironing board and press all those bias seams open. Then, fold the strip in half and press along the entire length, wrong sides together. The picture on the bottom shows the piece after it's been pressed. Just wanted to show you the crease. Keep yours folded together.


      Now, grab your quilt binding and let's clip or pin the binding to the entire perimeter of the top of the quilt. Align the raw edges of the quilt and the raw edges of the binding strips. 

      Next, we want to make sure none of the bias seams end up at the quilt corners... so start Wonder Clipping the binding somewhere along the middle of one of the sides or the bottom edge. I chose to start on 1 of the long sides, and the black arrow shows my starting and ending points, with the excess pulled up to show you. When you're clipping the binding to the quilt, if any of your bias seams end up within a few inches of any of the 4 corners, adjust your starting point so no seams end up near the corners. 


      To go around the corners, fold the strip up, creating a diagonal fold. Finger press (use your finger like an iron to press a crease), and keeping that diagonal fold in place, bring the strip back in line with the next quilt edge. (See my lovely illustration above.) You'll do the same thing when you're stitching the binding to the front of the quilt.


      Now, with your binding clipped/pinned to the perimeter of the quilt, power up your sewing machine and let's start attaching the binding to the front of the quilt. Start stitching about 6" from the beginning of your binding, using a 1/4" seam allowance. (You'll want to leave those 6" available so we can piece the beginning and end of the binding strip together.) 

      When you reach a corner, stop 1/4" before you reach the end and then stitch a diagonal line to the corner. (Left image shows me stopping 1/4" from the end; right images shows me stitching diagonally down to the corner.) Stitching this diagonal line with help us make the diagonal fold.


      When you reach the corner, fold the strip to create a diagonal fold. Finger press and then while keeping the diagonal fold in place, pull the strip in alignment with the next edge. (See above.) Continue stitching 1/4" seam allowance on the new edge. Repeat this all around the quilt, until you get to within 10-15" of where you started stitching. Stop stitching when you get that close because we'll need to join the loose ends of our binding strips. Backstitch at the end and remove the quilt from the sewing machine.

      Starting with the first binding strip (where we started stitching it to the quilt), lay it in place along the quilt's edge. Do the same for the other binding strip tail, but lay it on top of the first strip. (See left image above.) By finger pressing, crease the second binding tail where it meets the first tail's end. From that crease, measure 2 1/2" (which is the width of our jelly roll binding strip) and mark it with a disappearing marker.

      Cut a straight line along your marked line. (You can very faintly see my crease mark above. Look between the red and white striped scarf and the red sweater. Just to reiterate, I measured 2 1/2" from that crease mark to make my cutting line. You can see that the 2 binding strip tails overlap. This is what we want. Check and double-check before you do any cutting.)


      Open up the binding strip tails and place them with right sides together. Pin or clip these strips together, and using your ruler and disappearing marker, draw a diagonal line as shown above. (Mine is a faint white line.)


      Before we stitch over this diagonal line, let's make sure our binding isn't twisted. Fold the strip back in half and make sure it lines up with the quilt's edge without any twisted fabric. If it's right, head on over to the sewing machine and stitch on top of your diagonal line.

      Remove the quilt from your sewing machine. Now it's time to trim that triangle off, leaving a 1/4" seam allowance. Use the same technique that we did in the beginning of this tutorial (line your 1/4" ruler mark on your stitch line).
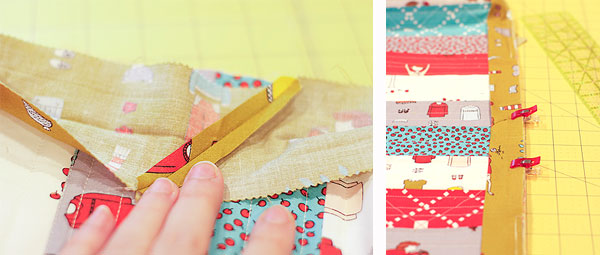
      Use your fingers to press open the seams. (You can also press with a warm iron if needed.) Fold the binding closed and return to your sewing machine to finish stitching the binding onto the quilt top. 


      Alright, we've made it to the final step: attaching the quilt binding to the back. Pull out those handy Wonder Clips and fold the binding over to the back side of the quilt (left image above). You can also pin it or press it with an iron to help keep the shape as you hand stitch. Start with needle and thread in hand and use a thread length that's comfortable for you to work with. (I usually work with a yard at a time.)

      Put a knot at the end of your thread. Now let's hide that knot in our quilt sandwich under the binding -- so it's completely hidden. 

      Next, we're going to ladder stitch all the way around, taking stitches that are 1/8" - 1/4" long. Nothing bigger than that. Pull the needle through the folded part of the binding (middle image), then take a stitch in the quilt sandwich -- just through the batting and backing layers and not the quilt top (right image). 

      When you're stitching through the quilt sandwich layer, make sure it's just to the outside of the stitch line created by attaching the binding to the front. (You can see my stitch line under the binding in the right image.) 

      By using a ladder stitch, we're able to hide our threads completely. I've drawn a little picture of a ladder stitch above so you can see how this is going to work.

      And gosh, look at that! We're all done! Can't wait to throw mine in the washing machine... I love that crinkly look quilts get after being washed. 

      I hope you've enjoyed this tutorial! If you have any questions about any of the steps, leave a comment for us and we'll reply.

      --------------------------------------------------------------------


      Jelly Roll Strip Quilt quilt-along: Part 6
      Continue reading
    • Jelly Roll Strip Quilt quilt-along: Part 5, Quilting

      We are sooo close to being done with this jelly roll strip quilt! Are you excited?! I sure am!

      And with our quilt sandwich all made, today we're going to start quilting. Straight line quilting is a great place to start when quilting for the first time. Though the technique is simple (and by technique I really mean just stitching along in a straight line), the results can be quite eye-catching and very modern! 


      To start, let's go back to our quilt sandwich and gently roll or fold it toward center from both edges (image above). We're doing this so we can easily move it to the sewing machine without messing up our quilt sandwich efforts. Also, I find it helpful to have the quilt rolled up like this while quilting the first few lines on to the quilt. (After the first few lines, I find it easier to work with a looser quilt.)

      Now a few things to keep in mind while quilting:

      1. Make sure your sewing machine is on a large table with plenty of open space. We do this so our quilt doesn't hang over the edge of the table and distort the stitches and straight lines. (Quilts can be pretty heavy -- and if they hang off the table, your quilt will have a hard time moving through the machine. In fact, I'm guessing it won't move very much!)
      2. Look through your sewing machine feet, find your walking foot and use this one for straight line quilting -- or if you have built-in dual feed, select the proper foot and engage the dual feed for quilting. (I have built-in dual feed, so if you notice my foot doesn't look your typical walking foot in the pictures shown in this tutorial, that's why.) Your walking foot or dual-feed, along with your machine's feed dogs, will help feed your top and bottom fabrics evenly.
      3. Let's nose through your sewing machine accessories again, this time looking for a seam guide (see image below). You can also check your sewing machine manual to see if it's included. If you have one, go ahead and install it. We'll use this to keep our lines straight as we quilt.
      4. If you've never quilted before, make a small quilt sandwich out of some leftover fabric scraps (not the left-over jelly roll strips, though!) and batting and do a trial run. You can also do this to determine if you want to change up your stitch length or choose a decorative stitch.
      5. Get something to drink and put some of your favorite music on.

      Ready?

      Load the quilt on to your sewing machine. We're going to start quilting in the center of the quilt. (That's why we folded the edges toward the center when we rolled up our quilt sandwich -- leaving a nice open space in the middle of the quilt for us to begin.) 

      You'll need to use your hands to gently support the quilt throughout this entire process. Don't pull the quilt top with your hands, though; your sewing machine will feed the fabric through. Your hands should rest comfortably to the left and right of your the foot/needle on the bed of your sewing machine.

      When you take your first few stitches, make sure you backstitch to lock your stitch. You'll do this at the beginning and end of every new quilted line. Some sewing machines allow you to program an automatic backstitch, but if you don't have that, fear not... there's a special button for that (image above). You just need to take about 2-3 backstitches to lock it in. Easy.

      Now, feed the quilt through in straight lines, using both of your hands to help guide the quilt. Make sure you don't let the quilt hang off the table edges.

      You can space your lines any way you want. Mine are random, with lines 1/4" - 2" apart. You can use the right or left edge of your foot lined up against a jelly roll strip to help keep your lines straight (image 1). Alternatively, if you have a seam guide, you can move it to the left or right and line it up on a previous line or a jelly roll strip edge (image 2).

      Quilt to your heart's content. Be sure to take breaks -- or do the quilting over the course of a couple of days. This is not typically something that can be done in a single setting. Quilting takes time!

      I'll be back on Friday with our final installment of the Jelly Roll Strip Quilt quilt-along. We'll be making and attaching the binding!


      --------------------------------------------------------------------

       
      Jelly Roll Strip Quilt quilt-along: Part 5 (you are here) 


        Continue reading
      1. Jelly Roll Strip Quilt quilt-along: Part 4


        We are moving right along with our Jelly Roll Strip Quilt quilt-along! Today, with our quilt top and back all pieced, we'll focus our efforts on making the quilt sandwich. 


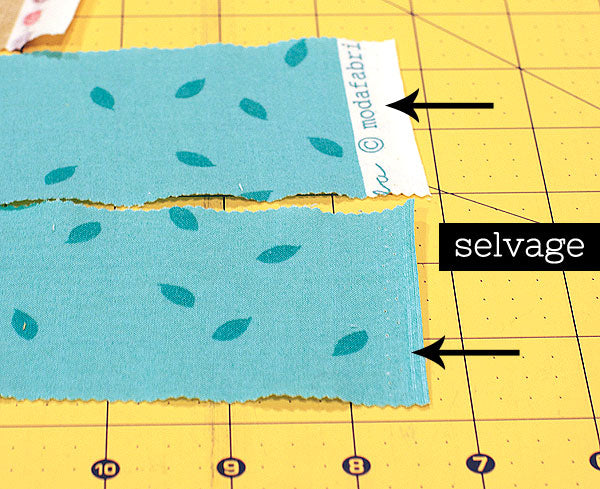
        Before we assemble the quilt sandwich, though, we're going to square up our quilt top. Just the quilt top. If you look at all your jelly roll strips, you'll notice the selvages are still there on both sides. One of the selvages is usually white while the other selvage edge is typically the same color and print as the fabric (see image above). We'll need to trim both sides during the squaring up process. 


        To square up, we'll need to determine how much needs to come off both sides and make straight cuts from there. How do we determine this? As you can see from image 1 above, some selvages are wider than others. The red strip in image 1 has a slightly wider selvage than the rest and is the one that we'll use to determine how much to cut off. Do this for both sides.

        For squaring up, we'll need our 6" x 24" ruler (or 12" x 12" square ruler if you have one), rotary cutter and cutting mat. Start by folding the quilt top in half lengthwise (your top and bottom jelly roll strips will end up being back to back this way). Since we kept our 1/4" seams nice and neat while piecing those strips, the edges match up well and are straight. :-) We won't have to trim the top or bottom -- just the selvage sides. 

        With the quilt top still folded, place it on your cutting mat (image 2) and line your ruler up for a straight cut on the fabric (image 3). You can achieve this by lining up the bottom of the ruler on the folded edge and the long side of your ruler on the selvage edge. See image 3 above.


        Once it's lined up and straight (check and double-check here -- you can't undo a cut!), go ahead and trim the selvage edges (image 1). Do the same for the other selvage edge and you'll end up with a squared up quilt top (image 2). Looks great!

        Now on to the quilt sandwich!


        The quilt sandwich is made up of 3 parts: the quilt top, the batting, and the quilt back. To make the quilt sandwich, we're going to need a bit of open space -- either on a hard/carpeted floor or a wall. We're also going to need some masking tape or other heavier duty tape. (Scotch tape will not do.) 

        One more note: the quilt back should be the largest of the 3 sandwich pieces, followed by the batting and the quilt top (which is the smallest). When creating the quilt sandwich, you'll want to center each layer on top of the previous layer. This is extremely useful for the quilting process, when some minor shifting and shrinking from the actual quilting will occur. 

        To make the quilt sandwich, start by laying the quilt backing out on the floor (or taped to the wall) with the right side down and the wrong side facing up. Use your hand to smooth out any wrinkles; you want this to be completely flat so you don't have any puckers or tucks when you start quilting. Take your time here.

        Once you've done that, grab some tape and tape the backing to the floor (or wall). When I tape, I find it helpful to start with a short end and then tape the opposite end, pulling things taut. Don't pull so tight that you distort the fabric. We're just trying to remove all wrinkles and get the backing flat and straight. Then tape the long side in a few spots and again, tape the opposite side. Continue pulling the fabric taut to remove wrinkles. I do the 4 corners last, again working with opposites. Tape those, too. Then give it a final check and make sure it's wrinkle-free.

        With the quilt backing laid out, it's time to layer the quilt batting on top of it. Just like with the backing, use your hand to smooth out wrinkles and creases. I like to work from the middle out. Make sure it's centered on the quilt back. Next, we're going to spray baste the batting to the quilt back.* To do so, fold the top half of the batting down. Spray a light layer of a temporary adhesive spray like Sulky KK2000 (or 505 or whatever you have) on to the batting. Gently roll the batting back down, smoothing it out on to the quilt backing as you go. Repeat those steps for the bottom half of the batting.

        Now it's time to put on the final layer of the quilt sandwich: the squared up quilt top. We'll do this just like we did the batting: lay it out centered on the batting, fold back the top half of the quilt top, lightly spray the adhesive onto the batting, and smooth the quilt top back down onto the batting. Do the same for the bottom half. 

        When you're all done, give it all a final check to make sure all fabric is pulled taut and there are no wrinkles or creases on any of the layers. Now you're ready to move on to quilting in Part 5! Check back on Monday for that tutorial!

        And if you have any questions, leave them in the comments section!

        --------------------------------------------------------------------

        *For the adhesive spray, choose a temporary adhesive spray like Sulky KK2000. It's never gummed up my sewing machine, is non-toxic and non-flammable. Also, since it's temporary, you can reposition the quilt top should you need to. (Please read the instructions on your can before using.)

        --------------------------------------------------------------------

        Jelly Roll Strip Quilt quilt-along: Part 4 (you are here)


        Continue reading