Jelly Roll Strip Quilt quilt-along: Part 4

We are moving right along with our Jelly Roll Strip Quilt quilt-along! Today, with our quilt top and back all pieced, we'll focus our efforts on making the quilt sandwich.

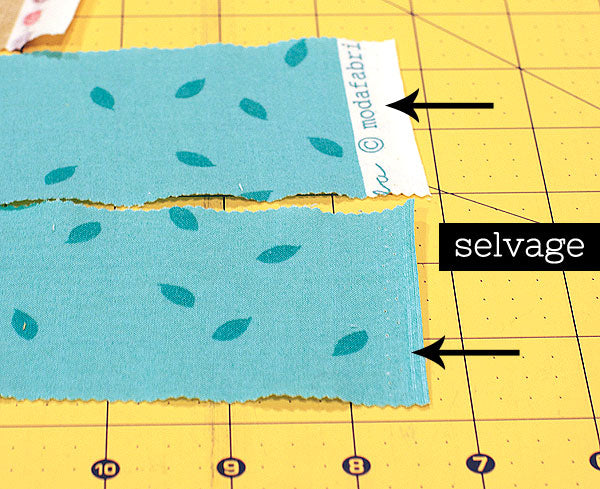
Before we assemble the quilt sandwich, though, we're going to square up our quilt top. Just the quilt top. If you look at all your jelly roll strips, you'll notice the selvages are still there on both sides. One of the selvages is usually white while the other selvage edge is typically the same color and print as the fabric (see image above). We'll need to trim both sides during the squaring up process.

To square up, we'll need to determine how much needs to come off both sides and make straight cuts from there. How do we determine this? As you can see from image 1 above, some selvages are wider than others. The red strip in image 1 has a slightly wider selvage than the rest and is the one that we'll use to determine how much to cut off. Do this for both sides.
For squaring up, we'll need our 6" x 24" ruler (or 12" x 12" square ruler if you have one), rotary cutter and cutting mat. Start by folding the quilt top in half lengthwise (your top and bottom jelly roll strips will end up being back to back this way). Since we kept our 1/4" seams nice and neat while piecing those strips, the edges match up well and are straight. :-) We won't have to trim the top or bottom -- just the selvage sides.
With the quilt top still folded, place it on your cutting mat (image 2) and line your ruler up for a straight cut on the fabric (image 3). You can achieve this by lining up the bottom of the ruler on the folded edge and the long side of your ruler on the selvage edge. See image 3 above.

Once it's lined up and straight (check and double-check here -- you can't undo a cut!), go ahead and trim the selvage edges (image 1). Do the same for the other selvage edge and you'll end up with a squared up quilt top (image 2). Looks great!
Now on to the quilt sandwich!

The quilt sandwich is made up of 3 parts: the quilt top, the batting, and the quilt back. To make the quilt sandwich, we're going to need a bit of open space -- either on a hard/carpeted floor or a wall. We're also going to need some masking tape or other heavier duty tape. (Scotch tape will not do.)
One more note: the quilt back should be the largest of the 3 sandwich pieces, followed by the batting and the quilt top (which is the smallest). When creating the quilt sandwich, you'll want to center each layer on top of the previous layer. This is extremely useful for the quilting process, when some minor shifting and shrinking from the actual quilting will occur.
To make the quilt sandwich, start by laying the quilt backing out on the floor (or taped to the wall) with the right side down and the wrong side facing up. Use your hand to smooth out any wrinkles; you want this to be completely flat so you don't have any puckers or tucks when you start quilting. Take your time here.
Once you've done that, grab some tape and tape the backing to the floor (or wall). When I tape, I find it helpful to start with a short end and then tape the opposite end, pulling things taut. Don't pull so tight that you distort the fabric. We're just trying to remove all wrinkles and get the backing flat and straight. Then tape the long side in a few spots and again, tape the opposite side. Continue pulling the fabric taut to remove wrinkles. I do the 4 corners last, again working with opposites. Tape those, too. Then give it a final check and make sure it's wrinkle-free.
With the quilt backing laid out, it's time to layer the quilt batting on top of it. Just like with the backing, use your hand to smooth out wrinkles and creases. I like to work from the middle out. Make sure it's centered on the quilt back. Next, we're going to spray baste the batting to the quilt back.* To do so, fold the top half of the batting down. Spray a light layer of a temporary adhesive spray like Sulky KK2000 (or 505 or whatever you have) on to the batting. Gently roll the batting back down, smoothing it out on to the quilt backing as you go. Repeat those steps for the bottom half of the batting.
Now it's time to put on the final layer of the quilt sandwich: the squared up quilt top. We'll do this just like we did the batting: lay it out centered on the batting, fold back the top half of the quilt top, lightly spray the adhesive onto the batting, and smooth the quilt top back down onto the batting. Do the same for the bottom half.
When you're all done, give it all a final check to make sure all fabric is pulled taut and there are no wrinkles or creases on any of the layers. Now you're ready to move on to quilting in Part 5! Check back on Monday for that tutorial!
And if you have any questions, leave them in the comments section!
--------------------------------------------------------------------
*For the adhesive spray, choose a temporary adhesive spray like Sulky KK2000. It's never gummed up my sewing machine, is non-toxic and non-flammable. Also, since it's temporary, you can reposition the quilt top should you need to. (Please read the instructions on your can before using.)
--------------------------------------------------------------------

Leave a comment