Finishing your Farmhouse Sampler quilt

This is it! The final post in the Farmhouse Sampler quilt-along. Today, we'll be sharing some details on how to finish your quilt top so you can get snuggling under your Farmhouse Sampler quilt in no time!
As mentioned in the first blog post, you have your choice of 2 finishing options. The first includes simple strips between the rows, while the second has a combination of strips and blocks.
If you're going for strips, use the diagram and cut instructions below as your guide.
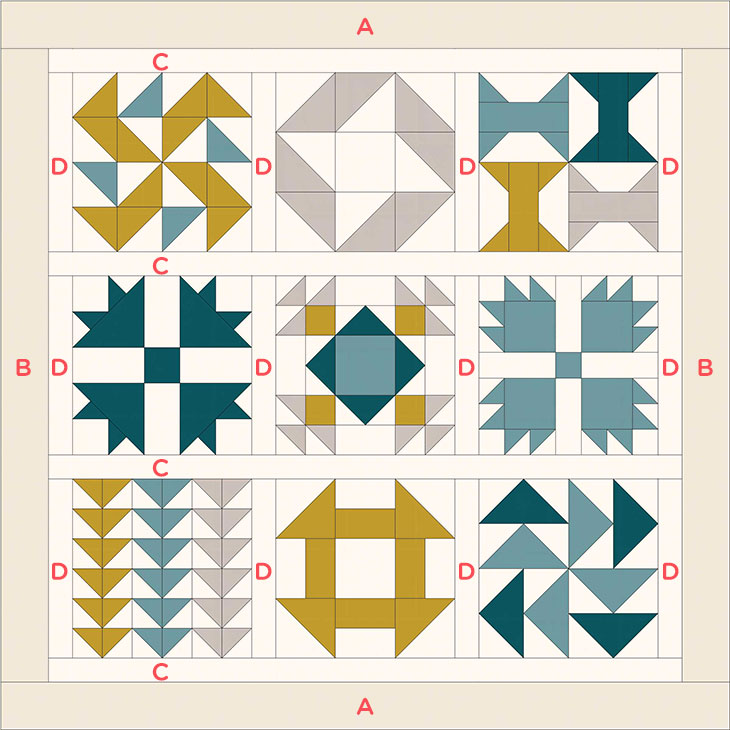
FINISH A cutting instructions:
- two (2) 4-1/2" x 61-1/2" strips from A
- two (2) 4-1/2" x 53-1/2" strips from B
- four (4) 2-1/2" x 53-1/2" strips from C
- twelve (12) 2-1/2" x 15-1/2" strips from D
To assemble your quilt top, begin by attaching your "D" strips to your blocks. Once you've done that, you can sew your blocks together to make 3 rows. Next, piece your "C" strips to your rows, and then piece your rows together. Now all that's left is to attach your border strips. Start by attaching your "B" border to the sides and then piece your "A" border to the top and bottom. Your quilt top is now finished and should measure approximately 61" x 61".
If you'd like to have some accent blocks and strips, use the diagram and cutting instructions below:
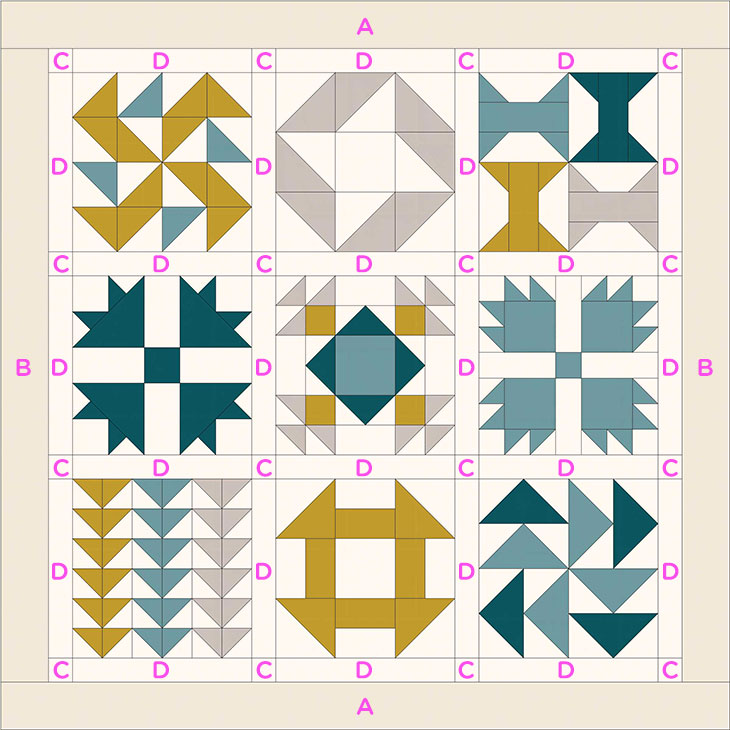
FINISH B cutting instructions:
- two (2) 4-1/2" x 61-1/2" strips from A
- two (2) 4-1/2" x 53-1/2" strips from B
- sixteen (16) 2-1/2" squares from C
- twenty-four (24) 2-1/2" x 15-1/2" strips from D
To assemble, begin by attaching your "D" strips to the left and right sides of your blocks. (Do not attach the top and bottom "D" strips to the block yet.) Then sew your "C" and remaining "D" blocks to make long strips to go between the rows. Once your strip is sewn, you can piece it to your rows. Sew the rows together. To attach the border, piece your "B" strips to the sides, followed by the "A" strips. Your quilt top is now completed and should measure approximate 61" x 61".
Now all that's left is the binding, backing, and quilting. If you have questions, please feel free to leave them in the comments. We do our best to answer them in a timely manner.
As always, please (pretty please) tag us on Instagram with your finished quilts and blocks. You can tag us @bloomeriefabrics and add #farmhousesamplerquilt to your pictures. We'd love to see how yours turned out!
We hope you've enjoyed this quilt-along. We had a lot fun and really enjoyed seeing you put your own spin on the blocks and fabric.
Hi Davida! Block 4 is Goose Tracks. Here’s the link to it: https://www.bloomeriefabrics.com/blogs/blog/farmhouse-sampler-block-4-goose-tracks
On the farmhouse sampler, I just started doing this but cannot find the pattern for the block 4. I found all the others but not #4. Could you please send me farmhouse sampler block #4?.
Thank you,
Davida McMullen
So glad you found the tutorial, Shanna. To find all the blocks, go to:
https://www.bloomeriefabrics.com/blogs/blog/tagged/quilt-along (copy & paste).
Enjoy!
I am just joining in and am so excited! Thank you for putting this together! I can’t find the block 8 tutorial. Am I missing it?