• Jelly Roll Strip Quilt quilt-along: Part 4


    We are moving right along with our Jelly Roll Strip Quilt quilt-along! Today, with our quilt top and back all pieced, we'll focus our efforts on making the quilt sandwich. 


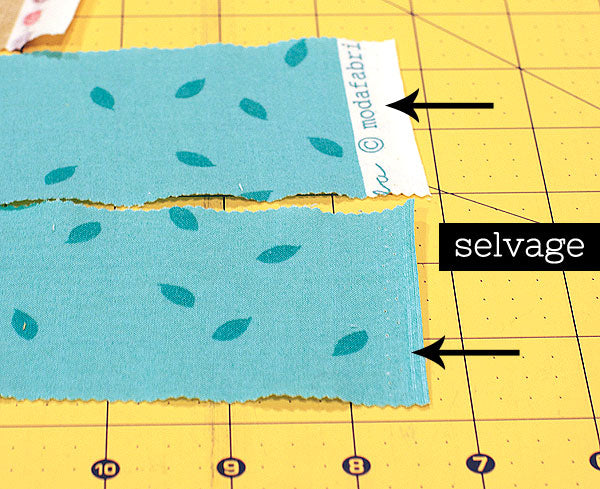
    Before we assemble the quilt sandwich, though, we're going to square up our quilt top. Just the quilt top. If you look at all your jelly roll strips, you'll notice the selvages are still there on both sides. One of the selvages is usually white while the other selvage edge is typically the same color and print as the fabric (see image above). We'll need to trim both sides during the squaring up process. 


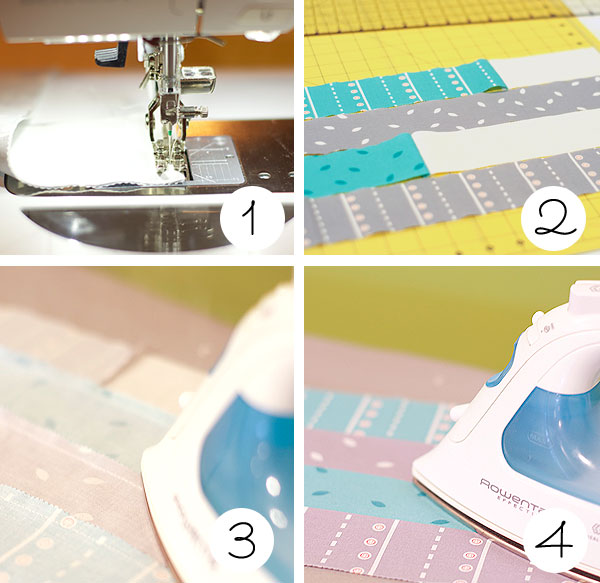
    To square up, we'll need to determine how much needs to come off both sides and make straight cuts from there. How do we determine this? As you can see from image 1 above, some selvages are wider than others. The red strip in image 1 has a slightly wider selvage than the rest and is the one that we'll use to determine how much to cut off. Do this for both sides.

    For squaring up, we'll need our 6" x 24" ruler (or 12" x 12" square ruler if you have one), rotary cutter and cutting mat. Start by folding the quilt top in half lengthwise (your top and bottom jelly roll strips will end up being back to back this way). Since we kept our 1/4" seams nice and neat while piecing those strips, the edges match up well and are straight. :-) We won't have to trim the top or bottom -- just the selvage sides. 

    With the quilt top still folded, place it on your cutting mat (image 2) and line your ruler up for a straight cut on the fabric (image 3). You can achieve this by lining up the bottom of the ruler on the folded edge and the long side of your ruler on the selvage edge. See image 3 above.


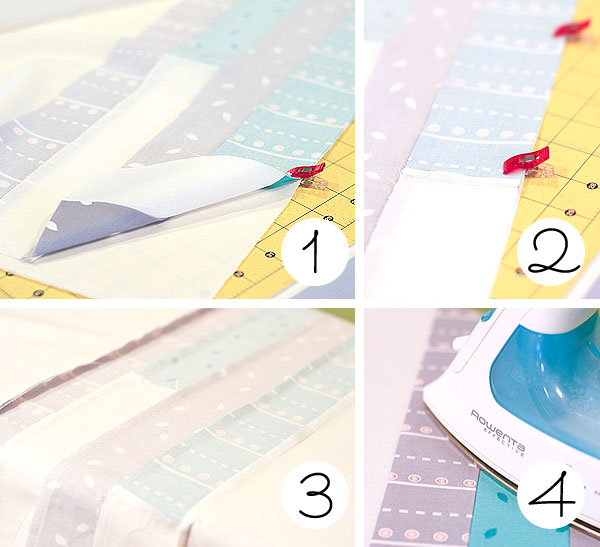
    Once it's lined up and straight (check and double-check here -- you can't undo a cut!), go ahead and trim the selvage edges (image 1). Do the same for the other selvage edge and you'll end up with a squared up quilt top (image 2). Looks great!

    Now on to the quilt sandwich!


    The quilt sandwich is made up of 3 parts: the quilt top, the batting, and the quilt back. To make the quilt sandwich, we're going to need a bit of open space -- either on a hard/carpeted floor or a wall. We're also going to need some masking tape or other heavier duty tape. (Scotch tape will not do.) 

    One more note: the quilt back should be the largest of the 3 sandwich pieces, followed by the batting and the quilt top (which is the smallest). When creating the quilt sandwich, you'll want to center each layer on top of the previous layer. This is extremely useful for the quilting process, when some minor shifting and shrinking from the actual quilting will occur. 

    To make the quilt sandwich, start by laying the quilt backing out on the floor (or taped to the wall) with the right side down and the wrong side facing up. Use your hand to smooth out any wrinkles; you want this to be completely flat so you don't have any puckers or tucks when you start quilting. Take your time here.

    Once you've done that, grab some tape and tape the backing to the floor (or wall). When I tape, I find it helpful to start with a short end and then tape the opposite end, pulling things taut. Don't pull so tight that you distort the fabric. We're just trying to remove all wrinkles and get the backing flat and straight. Then tape the long side in a few spots and again, tape the opposite side. Continue pulling the fabric taut to remove wrinkles. I do the 4 corners last, again working with opposites. Tape those, too. Then give it a final check and make sure it's wrinkle-free.

    With the quilt backing laid out, it's time to layer the quilt batting on top of it. Just like with the backing, use your hand to smooth out wrinkles and creases. I like to work from the middle out. Make sure it's centered on the quilt back. Next, we're going to spray baste the batting to the quilt back.* To do so, fold the top half of the batting down. Spray a light layer of a temporary adhesive spray like Sulky KK2000 (or 505 or whatever you have) on to the batting. Gently roll the batting back down, smoothing it out on to the quilt backing as you go. Repeat those steps for the bottom half of the batting.

    Now it's time to put on the final layer of the quilt sandwich: the squared up quilt top. We'll do this just like we did the batting: lay it out centered on the batting, fold back the top half of the quilt top, lightly spray the adhesive onto the batting, and smooth the quilt top back down onto the batting. Do the same for the bottom half. 

    When you're all done, give it all a final check to make sure all fabric is pulled taut and there are no wrinkles or creases on any of the layers. Now you're ready to move on to quilting in Part 5! Check back on Monday for that tutorial!

    And if you have any questions, leave them in the comments section!

    --------------------------------------------------------------------

    *For the adhesive spray, choose a temporary adhesive spray like Sulky KK2000. It's never gummed up my sewing machine, is non-toxic and non-flammable. Also, since it's temporary, you can reposition the quilt top should you need to. (Please read the instructions on your can before using.)

    --------------------------------------------------------------------

    Jelly Roll Strip Quilt quilt-along: Part 4 (you are here)


    Continue reading
  • Jelly Roll Strip Quilt quilt-along: Part 3


    Thursday's here and as promised, we've got part 3 of our Jelly Roll Strip Quilt quilt-along. We just finished piecing the quilt top and now it's time to focus on the quilt back. If you're just joining us, check out part 1 and part 2 to see what we've done so far.


    Before we move along to the quilt back, let's do 1 more thing to the quilt top: press those seams. Typically, I like to press my seams open because it reduces bulk for quilting and gives a cleaner line. However, because our quilt top is just straight strips, I personally feel like pressing the seams open gives the strips a little too much give -- leaving them more vulnerable to stretching and ripping. 

    So on this strip quilt, we're going to be pressing our seams in 1 direction (images 2 and 3). Use a hot iron to press all those seams. When you're done with that, give the quilt top a good press on the front, too (image 4), making sure you keep all those seams pressed down to one side.

    Let's turn our attention to the quilt back. The graphic you see above is the design I came up with for my quilt back. Feel free to follow it to a T or come up with your own design. This is a great place to try out something new. If you're going to come up with your own design, just keep in mind that your quilt back needs to be a few inches larger all around than your quilt top. I suggest a minimum of 44" x 60" for this quilt. (These extra inches are your insurance policy that your backing will be large enough to compensate for any shifting and shrinking that will happen during the machine-quilting process.)

    Personally, I'm a big fan of white (and off-white, winter white, cream, ivory...) -- so that's what I'm using for the majority of my quilt back, along with 4 jelly roll strips that were unused from my quilt top.

    Here's what you'll need to cut:

    • 2 pieces, each 26 1/4" x 44/45" - Moda Bella Solid in Off-White
    • 4 jelly roll strips: 2 strips cut to 37 1/4" long and 2 strips cut to 34 1/4" long
    • 2 pieces, each 2 1/2" x 7 1/4" - Moda Bella Solid in Off-White
    • 2 pieces, each 2 1/2" x 10 1/4" - Moda Bella Solid in Off-White

    The measurements listed above do include the 1/4" seam allowance.


    Once we've got these pieces cut, lay them out as shown in the diagram so you know what needs to be pieced together. You're going to be sewing a 1/4" seam along the short 2 1/2" sides. To do so, take 1 of your 37 1/4" jelly roll strips and place a 7 1/4" solid strip on top, both pieces with right sides together. Pin or clip if needed and stitch using a 1/4" seam on your sewing machine (image 1). Repeat this process for the remaining strips (pairing the 34 1/4" with the 10 1/4" strip and the 37 1/4" with the 7 1/4" strip) and you'll end up with 4 pieced strips (image 2), each 44" long.

    Place them in the order you want for your quilt back because the next step is to piece these 4 strips together. Wonder Clip or pin in place, with right sides together. Use 1/4" seams and stitch along the long sides. When you're done piecing them together, it's time to press your seams in 1 direction (image 3). Then, flip it over and give the front a good press (image 4).

    Now it's time to piece the jelly roll strips to the top and bottom parts of the quilt back. Place the pieced jelly roll strips and 1 of the 26 1/4" x 44" pieces right sides together (image 1). Wonder Clip or pin them in place (image 2). Piece together on your sewing machine using a 1/4" seam allowance. Repeat the process to attach the bottom 26 1/4" x 44" piece. Press the seams down (image 3). Flip it over and press the quilt back (image 4).

    You've now got a quilt top and quilt back! Woo hoo!!!! 

    Check back in on Saturday, when we'll square up and get our quilt sandwich on for Part 4! And if you have any questions, leave them in the comments.

    ----------------------------------------------------------------------------------------------

    Jelly Roll Strip Quilt quilt-along: Part 1

    Jelly Roll Strip Quilt quilt-along: Part 2

    Jelly Roll Strip Quilt quilt-along: Part 3 (you are here)

    Continue reading
  • Jelly Roll Strip Quilt quilt-along - Part 2


    Happy Monday! I hope y'all had a chance to gather up your supplies for our Jelly Roll Strip quilt quilt-along! Today, as promised, we're going to start piecing the quilt top. The finished size will be approximately 42" x 56". Let's begin...

    Typically when you're making a quilt, you start off with cutting fabric. Fortunately for us, we're using a pre-cut jelly roll -- so we'll save a lot of time and bypass this step. (Don't you feel smart?)


    Step 1: All we have to do to start this strip quilt is unroll the jelly roll and press all your strips with a hot iron. (Now seriously, pat yourself on the back for choosing to work with pre-cuts because you've just saved yourself hours!)

    Now let's back up a second to that whole 'pressing' thing. If you're confused about pressing vs. ironing, here's the low-down:  when you're ironing, you drag the iron back and forth on your fabric. With pressing, you press the iron down on the fabric and then you lift it up, moving on to the next section till the whole thing is done. I know... I know... sounds nit-picky. But pressing will keep your fabric from stretching and distorting out of shape. And in the end, you'll have a better looking quilt with straighter lines.


    Step 2: Next, it's time to layout the quilt top. Using 28 of your jelly roll strips, lay them out in the order you want. This will leave you with some extra strips, which we'll use to have a little fun on the back of the quilt and also for our quilt binding. 

    Use a large table, the floor or a design board to lay out your strips. Just use what you have to get a good visual -- and spend a little time here to get the look you want. Also, keep in mind that if you have any directional fabrics you'll want to make sure you don't lay them out upside down. :-) 


    Step 3: Once you get them ordered the way you want, it's time to pin or Wonder Clip those strips together, two at a time. 

    Starting at the top of the quilt, grab the first 2 strips (see image 1 above). Place fabric right sides together (image 2), with the first strip on top and the second strip on the bottom (image 3). (The right side of fabric is the side with the print on it -- so our printed sides should be facing each other.) Be sure to line up the edges to make sure your strips are straight. Then pin or use your Wonder Clips along the length of the strip to keep the fabric in place (image 4).


    Step 4: Now it's time to turn on the sewing machine and piece your strips together, two at a time, using a 1/4" seam. (Make sure you've got a fresh needle in for the job. You'd be amazed at how much of a difference a good needle makes in the piecing process.) 

    To make it go a little quicker, chain piece the strips (image 2). Think of chain piecing like your own mini assembly line: Feed paired strips through the machine one after the other, without cutting the threads between strips. This saves time and thread. Be sure to feed your strips in order so you don't lose your layout. And remember to remove your pins or Wonder Clips before they come in contact with the foot or needle.

    You'll end up with 14 pairs of strips -- all connected by thread. 


    Step 5: Since our strips are still connected to one another from chain piecing (image 1), it's time to snip those threads (image 2). Using a seam ripper or scissors, snip the threads in between each strip. Remember to keep them in order (image 3).


    Step 6: Taking two pairs at a time, open up the strips (image 1), place fabric right sides together and line up the top edge (image 2). Then pin or Wonder Clip the strips along the top edge to keep the strips in place. You're going to be piecing along the Wonder Clipped (or pinned) side. And again, remember to keep all your strips in order!

    Step 7: Next, we're going to chain piece these together, two pairs at a time. Just like we did the first time around. And when you're done, you'll have 7 sets of strips (7 sets x 4 across = 28 strips). Snip the threads in between all the strips. And, yes, remember to keep them in order! :-) 


    Step 8: To complete the rest of the quilt top, repeat steps 3, 4, 5 and 6 until all your strips are joined together. This means you'll be pairing, pinning and piecing sets of 4 (image 1), then sets of 8 (image 2), and finally the 2 pieces that will give you a completed quilt top! 

    Note: When pairing, pinning and piecing the sets of 4, you'll notice that you'll have 1 set that doesn't have a match. No problem! Just piece it to the bottom of your last set. The point is just to get all strip sets pieced together to create the quilt top.

    Now, step back and have a look at your completed quilt top! We're almost there! 

    Check back in on Thursday for part 3. And if you have any questions, leave them in the comments area and we'll respond as soon as possible!

    ------------------------------------------------------------------

    Jelly Roll Strip Quilt - Part 1 


    Continue reading