

Thursday's here and as promised, we've got part 3 of our Jelly Roll Strip Quilt quilt-along. We just finished piecing the quilt top and now it's time to focus on the quilt back. If you're just joining us, check out part 1 and part 2 to see what we've done so far.

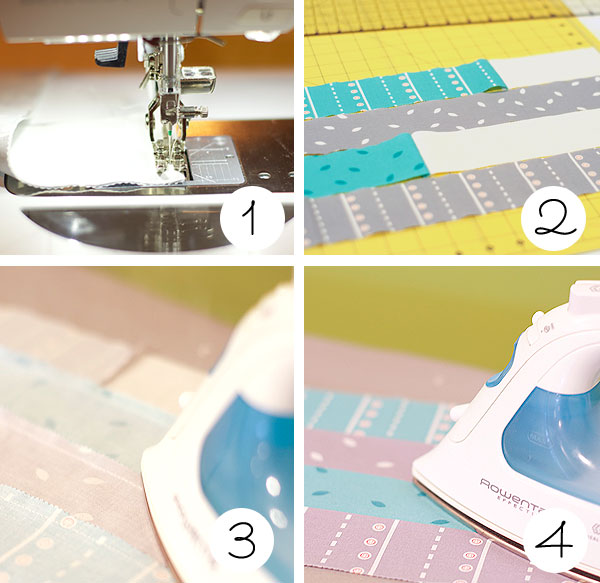
Before we move along to the quilt back, let's do 1 more thing to the quilt top: press those seams. Typically, I like to press my seams open because it reduces bulk for quilting and gives a cleaner line. However, because our quilt top is just straight strips, I personally feel like pressing the seams open gives the strips a little too much give -- leaving them more vulnerable to stretching and ripping.
So on this strip quilt, we're going to be pressing our seams in 1 direction (images 2 and 3). Use a hot iron to press all those seams. When you're done with that, give the quilt top a good press on the front, too (image 4), making sure you keep all those seams pressed down to one side.

Let's turn our attention to the quilt back. The graphic you see above is the design I came up with for my quilt back. Feel free to follow it to a T or come up with your own design. This is a great place to try out something new. If you're going to come up with your own design, just keep in mind that your quilt back needs to be a few inches larger all around than your quilt top. I suggest a minimum of 44" x 60" for this quilt. (These extra inches are your insurance policy that your backing will be large enough to compensate for any shifting and shrinking that will happen during the machine-quilting process.)
Personally, I'm a big fan of white (and off-white, winter white, cream, ivory...) -- so that's what I'm using for the majority of my quilt back, along with 4 jelly roll strips that were unused from my quilt top.
Here's what you'll need to cut:
The measurements listed above do include the 1/4" seam allowance.
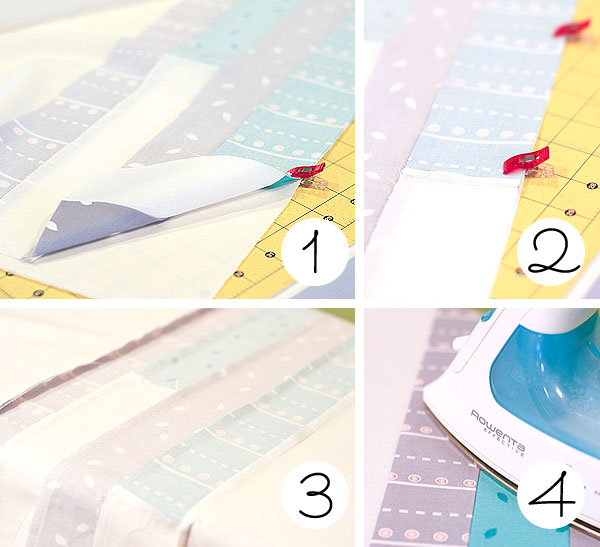
Once we've got these pieces cut, lay them out as shown in the diagram so you know what needs to be pieced together. You're going to be sewing a 1/4" seam along the short 2 1/2" sides. To do so, take 1 of your 37 1/4" jelly roll strips and place a 7 1/4" solid strip on top, both pieces with right sides together. Pin or clip if needed and stitch using a 1/4" seam on your sewing machine (image 1). Repeat this process for the remaining strips (pairing the 34 1/4" with the 10 1/4" strip and the 37 1/4" with the 7 1/4" strip) and you'll end up with 4 pieced strips (image 2), each 44" long.
Place them in the order you want for your quilt back because the next step is to piece these 4 strips together. Wonder Clip or pin in place, with right sides together. Use 1/4" seams and stitch along the long sides. When you're done piecing them together, it's time to press your seams in 1 direction (image 3). Then, flip it over and give the front a good press (image 4).
Now it's time to piece the jelly roll strips to the top and bottom parts of the quilt back. Place the pieced jelly roll strips and 1 of the 26 1/4" x 44" pieces right sides together (image 1). Wonder Clip or pin them in place (image 2). Piece together on your sewing machine using a 1/4" seam allowance. Repeat the process to attach the bottom 26 1/4" x 44" piece. Press the seams down (image 3). Flip it over and press the quilt back (image 4).
You've now got a quilt top and quilt back! Woo hoo!!!!
Check back in on Saturday, when we'll square up and get our quilt sandwich on for Part 4! And if you have any questions, leave them in the comments.
----------------------------------------------------------------------------------------------
Jelly Roll Strip Quilt quilt-along: Part 1
Jelly Roll Strip Quilt quilt-along: Part 2
Jelly Roll Strip Quilt quilt-along: Part 3 (you are here)
Leave a comment